아두이노란? 아두이노는 매우 쉽고 간단한 피지컬 컴퓨터 플랫폼입니다. 하지만 아주 강력하지요. 주말동안 가지고 놀아 본 아두이노는 아주 약간의 전자 지식만 있으면 매우 흥미있고 재밌는 것들을 만들 수 있을 것 같았습니다. 기본적으로 아두이노는 독립적으로 작동할 수 있지만 저는 항상 뭐든 플래시와 연관시키므로 이번에도 플래시와의 연동을 알아보겠습니다.
0. 준비물
- Arduino Starter KIT
- Flash CS5 – ColorSelect 예제
- as3glue
1. as3glue
첫번째로 as3glue 를 다운 받습니다. 아두이노와 플래시를 연동하기 위해서는 정확하게 3가지가 필요합니다. 아두이노에 올릴 스케치, 플래시와 아두이노를 이어줄 프록시서버 그리고 플래시를 만들기 위한 클라이언트 입니다. as3glue 프로젝트는 위에 언급한 3가지가 패키지로 모두 들어있습니다. 특히 플래시클라이언트가 as3 로 작성되어있어 사용하기 매우 편리합니다. 우선 위의 준비물에 있는 링크로 가서 as3Glue_v2_beta2.zip 파일을 다운 받습니다.

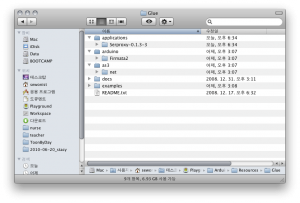
(이미지를 클릭하면 크게 볼 수 있습니다.) 압축을 풀면 위와 같은 폴더 구조입니다. 순서대로 applications 폴더에 있는 Serproxy-0.1.3-3 가 프록시 arduino 폴더에 있는 Firmata2 가 스케치 마지막으로 as3 폴더에 있는게 플래시용 클라이언트 입니다.
2. Firmata2
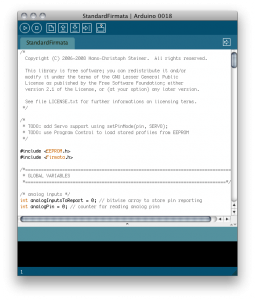
아두이노 IDE를 실행시키고 Firmata2 폴더에 있는 StandardFirmata.pde 를 열어서 아두이노에 올립니다.

3. Serproxy
serproxy 를 자신의 상황에 맞게 설정합니다. 아래는 제 serproxy.cfg 입니다.
# Config file for serproxy
# See serproxy's README file for documentation

# Transform newlines coming from the serial port into nils
# true (e.g. if using Flash) or false
newlines_to_nils=true

# Default settings
comm_baud=57600
comm_databits=8
comm_stopbits=1
comm_parity=none

# Idle time out in seconds
timeout=300

# Comm ports used
comm_ports=1

# Set TCP port and serial port
# you will have to change serial_device to reflect your configuration
# use "ls /dev/cu.usb*" to look for your Arduino serial port.
net_port1=5331
serial_device1=/dev/cu.usbserial-A700e17j
serproxy.cfg 를 메모장이나 vi 로 열어서 위와 같이 수정합니다. glue를 받아서 처음 serproxy.cfg 를 열었다면 위의 예제와 상당히 다를 수 있습니다. 그냥 위의 중요한 부분은 몇군데 안되므로 크게 걱정 할 필요 없습니다. 아 참고로 위의 설정은 MacOS 기준입니다. 윈도우의 경우 테스트는 해보지 않았지만 크게 다르지 않은 것 같습니다. 확인해야 하는 곳은 4군데 입니다. 우선 newlines_to_nils 값이 true 인지 확인 확인합니다. 다음 comm_baud 를 57600 을 설정합니다. net_port1은 플래시와 통신할 포트입니다. 기본은 5331 입니다. 마지막으로 serial_device1 값을 설정합니다. 이 값은 사용자 환경마다 다르니 자신의 /dev 폴더에서 확인하셔야 합니다. 윈도우의 경우 요 값만 없는 것 같습니다. 그러므로 윈도우사용자는 신경 안써도 될 것 같습니다.
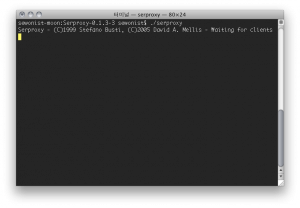
설정은 완료하였으면 serproxy를 실행해 줍니다. 윈도우의 경우 serproxy.exe 맥사용자는 serproxy 를 실행합니다.

4. Flash
자 이제 아두이노와 플래시를 연동할 거의 모든 준비가 되었습니다. 위에서 준비한 플래시용 클라이언트를 이용해서 화면의 픽셀 컬러값을 아두이노에 설치한 3개의 LED 로 보내보도록 하겠습니다. glue 에 있는 examples 를 이용해서 바로 확인 할 수도 있습니다. ColorSelect 의 소스는 위의 준비물에서 받을 수 있습니다.
package
{
	import flash.display.BitmapData;
	import flash.display.Sprite;
	import flash.events.Event;
	import flash.events.MouseEvent;
	import flash.geom.ColorTransform;

	import net.eriksjodin.arduino.Arduino;
	import net.eriksjodin.arduino.events.ArduinoEvent;

	public class colorselect extends Sprite
	{
		private var a:Arduino;
		private var _sheet:BitmapData;
		private var _colorTransform:ColorTransform;

		public function colorselect()
		{
			_colorTransform = new ColorTransform();

			_sheet = new BitmapData(550, 400, false, 0);
			_sheet.draw(this["mc_sheet"]);

			// Arduion
			a = new Arduino("127.0.0.1", 5331);
			// listen for connection
			a.addEventListener(Event.CONNECT,onSocketConnect);
			a.addEventListener(Event.CLOSE,onSocketClose);

			// listen for firmware (sent on startup)
			a.addEventListener(ArduinoEvent.FIRMWARE_VERSION, onReceiveFirmwareVersion);

			addEventListener(MouseEvent.MOUSE_MOVE, handleMouse);

		}

		private function handleMouse(e:MouseEvent):void
		{
			_colorTransform.color = _sheet.getPixel(mouseX, mouseY);
			//trace(_colorTransform.redOffset, _colorTransform.greenOffset, _colorTransform.blueOffset);
			a.writeAnalogPin(9, _colorTransform.redOffset);
			a.writeAnalogPin(10, _colorTransform.greenOffset);
			a.writeAnalogPin(11, _colorTransform.blueOffset);
		}

		// triggered when a serial socket connection has been established
		private function onSocketConnect(e:Object):void {
			trace("Socket connected!");
			// request the firmware version
			a.requestFirmwareVersion();
		}

		// triggered when a serial socket connection has been closed
		private function onSocketClose(e:Object):void {
			trace("Socket closed!");
		}

		// the firmware version is requested when the Arduino class has made a socket connection.
		// when we receive this event we know that the Arduino has been successfully connected.
		private function onReceiveFirmwareVersion(e:ArduinoEvent):void {
			trace("Firmware version: " + e.value);
			if(int(e.value)!=2) {
				trace("Unexpected Firmware version encountered! This Version of as3glue was written for Firmata2.");
			}
			// the port value of an event can be used to determine which board the event was dispatched from
			// this is one way of dealing with multiple boards, another is to add different listener methods
			trace("Port: " + e.port);

			// do some stuff on the Arduino...
			initArduino();
		}

		private function initArduino():void {
			trace("Initializing Arduino");
			// set a pin to PWM
			a.setPinMode(9, Arduino.PWM);
			a.setPinMode(10, Arduino.PWM);
			a.setPinMode(11, Arduino.PWM);

			a.writeAnalogPin(9, 0);
			a.writeAnalogPin(10, 0);
			a.writeAnalogPin(11, 0);
		}
	}
}
뭐가 엄청 길어보이지만 이것 역시 중요한 부분은 몇군데 없습니다. a = new Arduino(“127.0.0.1”, 5331); 우선 아두이노 객체를 생성합니다. 127.0.0.1은 자신컴을 가리키는 ip 입니다. 5331은 아까 Serproxy에서 설정한 net_port1 입니다. 그리고 사용할 Pin을 설정합니다. 이번 예제의 경우 아날로그 출력을 할 것이므로 setPinMode 함수로 9, 10, 11 번을 PWM 으로 설정했습니다. 그리고 플래시에서 마우스 이동시 마다 각 픽셀의 RGB 값을 writeAnalogPin 함수로 3개의 LED를 세팅합니다. 이제 플래시를 퍼블리싱 해보도록 하겠습니다.

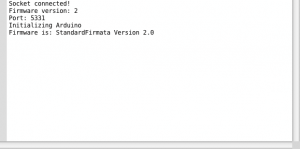
위와 같은 메세지가 출력되었다면 정상적으로 아두이노와 연결 된 것입니다.
5. Result
아두이노와 플래시를 연동하면 무엇이 좋을까요? 우선 천번째로는 스케치를 새로 작성해서 아두이노에 올릴 필요가 없어 집니다. 두번째는 어려운 C가 아니라 AS3로 코드를 작성 할 수 있습니다. 세번째는 플래시의 다양한 인터렉티브 요소를 접목 할 수 있습니다. 아두이노로 플래시 애니메이션을 컨트롤 할 수 있고 반대도 가능합니다. 물론 인터넷 연결도 가능해 집니다. 아직은 제가 아두이노에 대해서 많이 모르기 때문에 더 큰 가능성에 대해 설명 할 수 없는게 아쉽네요. 하지만 이 정도로도 충분히 아두이노의 “생각하고, 실험하고 즐겨라!” 에 동참 할 수 있었지 않나 싶습니다.
안녕하세요. 제 블로그에서 댓글을 보고 왔습니다. 블로그가 참 깔끔하고 멋지네요. 플래시와 연동하는 좋은 정보 잘 보고 갑니다.
앞으로 아두이노로 멋진 작품 만드시기를 기대하겠습니다. ^^
와우 RGB 대단한데요
Pingback: WiiFlash | Sewonist.com
Pingback: Arduino Fio & XBee Programming | Sewonist.com